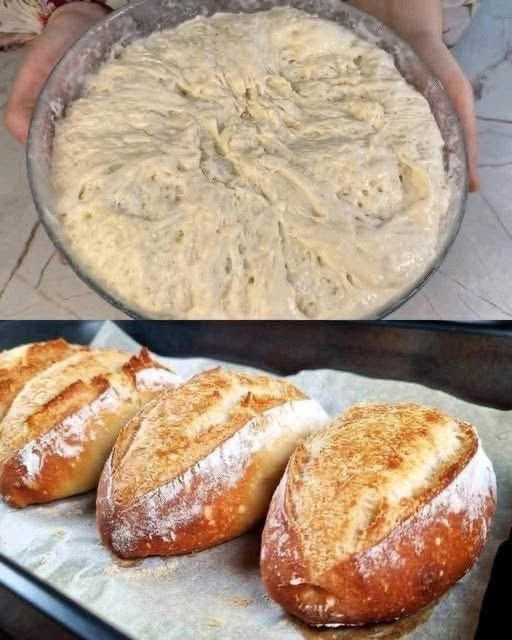
No Kneading • No Eggs • No Butter • Soft, Budget-Friendly Bread
Introduction
There’s something truly comforting about the aroma of freshly baked bread filling your home. If you’ve ever thought making bread was difficult or time-consuming, this recipe will change your mind. With no kneading, no eggs, and no butter, this simple bread is perfect for beginners and experienced bakers alike. Using just a handful of inexpensive pantry staples, you can create a soft, fluffy loaf with a golden crust that’s perfect for sandwiches, toast, soups, or simply enjoyed warm with your favorite spread.
This no-knead method relies on time rather than effort, allowing the dough to develop flavor and texture naturally. Whether you’re baking to save money, avoid store-bought bread, or simply enjoy homemade baking, this recipe is a reliable and delicious choice.
Ingredients
For the Bread
- 3½ cups (440 g) all-purpose flour or bread flour
- 1½ teaspoons salt
- 1 teaspoon instant yeast (or 1¼ teaspoons active dry yeast)
- 1½ cups (360 ml) warm water (about 105–110°F / 40–43°C)
- 1 tablespoon olive oil (optional, for a softer crumb)
Optional Add-Ins
- 1 teaspoon sugar or honey (to help activate the yeast)
- Mixed herbs (rosemary, thyme, or oregano)
- Garlic powder
- Sesame seeds
- Poppy seeds
- Rolled oats
- Sunflower seeds
- Pumpkin seeds
Equipment Needed
- Large mixing bowl
- Wooden spoon or spatula
- Kitchen towel or plastic wrap
- Loaf pan or Dutch oven
- Parchment paper
- Cooling rack
Instructions
Step 1: Mix the Dough
In a large bowl, combine:
- Flour
- Salt
- Instant yeast
Gradually pour in the warm water and olive oil (if using). Stir with a wooden spoon until all the flour is incorporated and a sticky dough forms.
Step 2: First Rise
Cover the bowl with a clean kitchen towel or plastic wrap.
Let the dough rise in a warm place for 1½ to 2 hours, or until it has doubled in size.
Step 3: Shape the Dough
Lightly flour your work surface.
Turn out the dough and gently shape it into a loaf or round. There’s no need to knead—just fold it over itself a few times to create a smooth shape.
Transfer it to a parchment-lined baking tray, loaf pan, or Dutch oven.
Step 4: Second Rise
Cover loosely and let the dough rest for 30–45 minutes while the oven preheats.
Step 5: Bake
Preheat the oven to 425°F (220°C).
Bake for 30–35 minutes, or until the loaf is golden brown and sounds hollow when tapped on the bottom.
If using a Dutch oven, bake covered for the first 25 minutes, then uncover and bake for another 10–15 minutes for a crisp crust.
Step 6: Cool
Transfer the bread to a wire rack and allow it to cool for at least 20 minutes before slicing.
Baking Methods
Classic Oven Method
Produces a beautifully crisp crust with a soft interior.
Dutch Oven Method
Creates artisan-style bread with an extra-crispy crust and chewy crumb.
Loaf Pan Method
Perfect for sandwich bread with even slices.
Bread Machine Method
Add the ingredients according to your bread machine’s instructions and use the basic bread cycle.
The History of No-Knead Bread
Bread has been a staple food for thousands of years, with evidence of bread-making dating back to ancient civilizations in Egypt and Mesopotamia. Traditional bread often required extensive kneading to develop gluten, but in the early 2000s, the no-knead method gained worldwide popularity. This technique demonstrated that a long fermentation period could naturally strengthen the dough, producing bakery-quality bread with minimal effort. Today, no-knead bread is loved by home bakers for its simplicity, affordability, and excellent results.
Health Benefits
Homemade bread offers several advantages over many commercially produced loaves:
- Free from unnecessary preservatives
- Budget-friendly and economical
- Easy to customize with whole grains or seeds
- Provides complex carbohydrates for energy
- Lower in saturated fat than many enriched breads
- Can be adapted for different dietary preferences
- Freshly baked with simple, wholesome ingredients
Approximate Nutritional Information (Per Slice)
- Calories: 130–150
- Carbohydrates: 26–30 g
- Protein: 4–5 g
- Fat: 1–2 g
- Fiber: 1–2 g
- Sodium: Varies based on the amount of salt used
Nutrition values are approximate and may vary depending on ingredients and loaf size.
Helpful Tips
- Use bread flour for a chewier texture.
- Measure flour accurately to avoid a dense loaf.
- Let the dough rise in a warm, draft-free area.
- Avoid adding too much extra flour—the dough should remain slightly sticky.
- Cool completely before slicing to preserve the bread’s texture.
- Store in a bread bag or airtight container to keep it fresh.
Serving Suggestions
Enjoy this homemade bread with:
- Butter or olive oil
- Jam or fruit preserves
- Honey
- Peanut butter
- Cheese
- Soups and stews
- Sandwiches
- Toast with avocado
- Garlic butter for homemade garlic bread
Storage
Room Temperature
Store in an airtight container or bread bag for up to 3 days.
Refrigerator
Not generally recommended, as refrigeration can dry out the bread more quickly.
Freezer
Slice the loaf and freeze for up to 3 months. Toast or thaw slices as needed.
Recipe Variations
- Replace part of the white flour with whole wheat flour.
- Add chopped olives and herbs for a Mediterranean twist.
- Mix in shredded cheese for a savory loaf.
- Sprinkle seeds on top before baking.
- Add cinnamon and raisins for a lightly sweet version.
Conclusion
This no-knead, no-eggs, no-butter bread proves that homemade baking can be simple, affordable, and incredibly rewarding. With just a few everyday ingredients and very little hands-on work, you’ll have a soft, flavorful loaf that rivals bakery bread. Whether you’re baking for your family, meal prepping for the week, or simply enjoying the pleasure of fresh bread, this recipe is one you’ll come back to again and again.
For the Lovers of Homemade Bread ❤️
Nothing compares to the satisfaction of pulling a warm loaf of bread from the oven. The crisp crust, soft interior, and comforting aroma make every slice a reminder that the simplest recipes are often the most memorable. Share it with family, enjoy it fresh from the oven, and create delicious moments around the table with every loaf. Happy baking!